Update July 2020 : Adobe has fixed its timecode issue but only for footage with 23.976 framerate ! There is still an issue with 29.97 framerate footage with Non Drop-Frame Timecodes.
Note : If you are not familiar with BRAW Studio yet, check our introduction article !
What is the Media Start Timecode Issue ?
What is a timecode ?
A timecode is a sequence of numeric codes which represents a specific time in the video representation. It is written with HH:MM:SS:FF (or HH;MM;SS;FF for non drop frames display) with :
- HH : hours
- MM : minutes
- SS : seconds
- FF : number of frames, depends on your framerate
The common framerates in the video world are 8, 12, 15, 23.976, 24, 25, 29.97, 30, 48, 50, 59.94, 60 and 120. What we call "NTSC Framerates" are the 23.976 and 29.97 framerates (they are 24 and 30 divided by 1.001).
In this article, we will often speak about the "Timecode" of a video clip : in Adobe CC it corresponds to the "Media Start" timecode, it's the timecode given for the first frame of a clip. In Premiere Pro, this timecode is displayed in the project panel (with "List View" activated, and not "Icon View").

What is the issue with BRAW Timecode ?
Adobe CC software read the header of the .braw file (which contains
some information about the video file) themselves, without using importers such
as BRAW Studio to do this job. When reading the timecode in this header, Adobe
makes an error and applies a round framerate (24, 30) for the internal
computation of the timecode. And because of this, the timecode is shifted in
time (it's not valid anymore and it will be different from other NLE).
BRAW files with 59.94 fps are not affected by this problem, so only BRAW files with 23.976 and 29.97 fps are concerned. In the last version of Premiere Pro (from 14.3 version), only 29.97 fps are concerned.
Sadly, Adobe does not let us correct this timecode in our importer, we can't correct it automatically at import. That's why we correct the timecode through our BRAW Studio Panel. See below how to correct the timecode in Premiere Pro.
Note that since it's an Adobe bug the timecodes from the Blackmagic's plugin are also wrong. You need the BRAW Studio Panel to correct them.
Should I be worried about this issue ?
This issue only concerns you if you are working with 23.976 (only for old versions of Premiere Pro before 14.3) or 29.97 fps files with Non Drop-Frame timecode and any of the two conditions apply :
- You need to get the right timecode because you work with
Timecodes, for example using a timecode overlay to match the frame
timecode of the same
.brawfile in another NLE where it is also imported - You need to export your timelines into a FCP .XML to be reimported in another NLE software, for example to grade your footage / sequences with DaVinci Resolve. The "Media Start" timecodes from Premiere Pro will be stored in the generated .XML and change the meaning of your clips' "in" and "out" points on your timelines. If the timecode is wrong, then the in and out points for every clip will be shifted. This can create errors in some software. For DaVinci Resolve, if the timecodes in the XML file are not correct, then it will either not import your timeline from the XML at all, or it will import the timeline and some shift will happen without being warned by Resolve.
On the other hand if you don't need a good timecode you probably shouldn't fix it, as fixing the timecode could lead to other errors later on : Shift in the timeline when relocating footage, please read our article about this : How do I avoid the Shift Issue in BRAW Studio ?
If you don't work with timecodes and only need a corrected XML then please follow our next section :
How can I get a correct FCP XML with BRAW Studio ?
The BEST way to do this without getting any issues or problems in your project is to use our FCP XML Export feature in our Panel.
You can also correct the timecode inside Premiere Pro, but then you could get the Shift Issue. Also, correcting the timecode of Merged Clips is impossible once the Merged Clip is created. So this feature is definitely the best option for you, and you just need to click on one button !
To open the panel, go to the top menu in Premiere Pro and click on Window -> Extensions -> BRAW Studio Panel. Then click on the "Export XML" tab. In this tab you will see a button to directly export your timeline (the one currently active in your project) into a corrected FCP XML (without any time shifts due to wrong timecodes). Note : this feature needs a registered BRAW Studio Premium license.

Premiere Pro Timecode correction
How do I correct the wrong timecode in Premiere Pro ?
Note : this section is for users who want to get a good timecode inside Premiere Pro because they work with Timecodes in their workflow. We strongly advise against fixing "Media Start" timecodes if you don't have a good reason to do so !
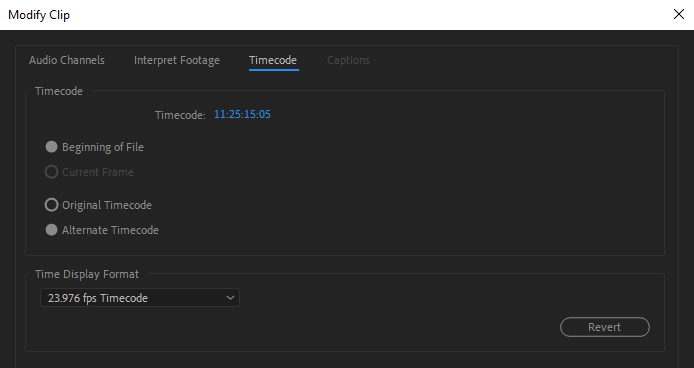
You can do it manually by right-clicking on your source item and selecting "Modify" -> "Timecode".

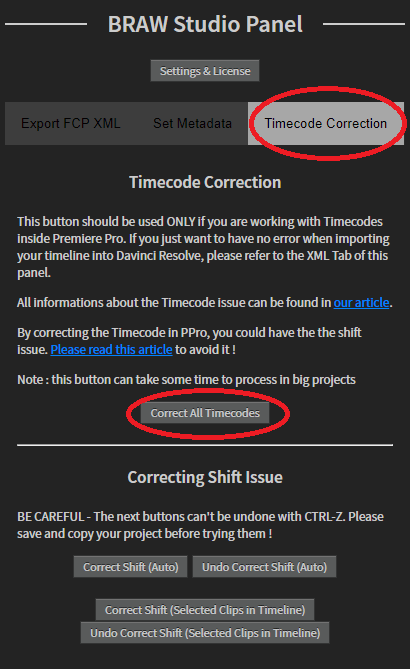
But if you need to do this for hundreds of clips, it will be painful ... Thanks to BRAW Studio there is a workaround to get a good timecode for NTSC footage automatically. For this, you need to use the BRAW Studio Panel and just click on a button !
To open the panel, go to the top menu in Premiere Pro and click on Window -> Extensions -> BRAW Studio Panel. Then click on the "Timecode Correction" tab.
After this, just click on the button "Correct All Timecodes" and all the NTSC BRAW footage timecodes in your project should be corrected automatically.

Et voilà !
Note that once the timecode is corrected, if you open the project and need to relink the braw files, you could still get the Shift Issue : please read our article about this carefully
How can I check if I have the right timecode ?
There are multiple ways to be sure your footage has a good timecode :
- Right-click on your footage and select "Properties...". At the bottom, the good timecode will be displayed.
- In the BRAW Studio Panel, in the "Metadata" tab, you will have your correct timecode BRAW clip displayed after selecting it.
- The special metadata we add to your file which is called : "BR Timecode" is the good timecode. Please read our dedicated article about the BRAW Metadata to know how to access them for more information<.
- We will send you a popup warning saying that the timecode is wrong when importing the footage. (Note : this warning can be avoided by ticking the good option in the "Settings & License" popup)

Could the timecode return back to its wrong value after a correction ?
Sadly, yes. If the clip gets offline, the timecode will be wrong again. (And after relinking also). So you will need to click on the panel's button again.
Also, there could be a shift issue when relinking your clip if you have the "Align Timecode" checkbox ticked. Please read our article about this issue for more precisions : How do I avoid the Shift Issue in BRAW Studio ?
Special cases
Proxies
Even when you correct the timecode before creating the proxy, the timecode of the proxy file will be wrong.
But if you have your proxy file linked with the original braw file, then you will be able to correct the timecode of the source like any normal BRAW source without proxy attached.
Merged clips
Merging Clips is a Premiere Pro feature which is often used to link Video with Audio. The best thing to do is to correct the timecode before merging the clips (note : even by being offline, the timecode will stay good !). Be careful, once the clips are merged, it's impossible to set their timecode in Premiere Pro !
Note that exporting FCP XML with our panel will correct the timecodes of Merged Clips !
After Effects
For now, it's impossible to correct the timecode in After Effects automatically. You will need to do manually by right-clicking in your source footage in the project panel and select "Interpret Footage" -> "Main...".
If it is painful for your workflow, please explain why and send us feedback about this on our Contact page !


