In this article we will explain to you how BRAW Studio for After Effects works with our two plugins :
- The Importer : the official way to import footage inside Adobe, it is simple enough for basic usage but hard to color grade on a daily basis with it
- and the Layer Settings : our new effect that will re-import the .braw footage, with more features for better daily workflows but a few drawbacks to know about
Note that if you are not familiar with BRAW Studio yet, check our introduction article.
BRAW Studio Importer in After Effects, and its official Source Settings
Importing the .braw will use our Importer by default
First, the BRAW Studio Importer imports the BRAW Source footage into After Effects. You can modify the BRAW Settings (color grade) of your imported footage by 2 different tools : the Source Settings from the Desktop Application and the Layer Settings from an After Effects optimized effect.
The importer will produce an image in 8 bits / 16 bits / 32 bits according to your Project Settings.
The default look of the imported .braw will be the Camera Metadata mode.
Changing Source Settings
Similar to Media Encoder and Premiere Pro, you can access and modify BRAW Studio Source Settings : change the color grade once for each imported "Source Item" in your project window ! You can access the Source Settings on your Source Item by right-clicking on it and selecting Interpret Footage -> Main... and then at the bottom of the opened modal popup click on the More Options... button. The Source Item is the one in the Project window, not the Layer in the Composition ! The column "Type" should say "Blackmagic RAW" to confirm it's indeed a .braw file behind and not something else (a Composition for example).
The Desktop Application will be opened automatically, and linked with this Source Item. If you change the BRAW Settings then click on "OK", the BRAW Settings will be applied to the imported footage. If you want to access global Settings or register your license, it is also where you should go ! At the top of the opened application click on the "Settings And License" tab. Don't forget you can also use this application to play and color grade .braw files directly from your desktop, as explained in this article.
Benefits : multiple color grade
If you need a different color grade for the same file, you can duplicate that Source Item and get a new file imported into your After Effects project, it will be the same filepath but a new Source Settings that you can modify independently of the first Source Settings, giving you a different look without impacting the first one. Or you can re-import the same file manually by importing a file in After Effects like you would do for any other file, After Effects will always create a new Source Item.
Accessing BRAW Settings from the Source Settings can be inconvenient and that's why we created the Layer Settings (more on that down below), but this method can prove useful for you in those cases :
- You need the same color grade applied automatically to all the times you import this Source Item in your compositions. You have nothign to do, the Source Settings are attached to the Source Item and the color grade will be applied automatically !
- You can't use the Layer Settings (drawbacks are discussed in the article) and want to avoid the Sidecar Camera Metadata workflow : you need multiple grade for one file by importing the file multiple times and changing its Source Settings
- You're only modiying Source Settings once in a while and you're OK going into this menu once or twice very rarely
- You like to use the Layer Settings for its GUI but you need the BRAW Settings to be applied on the Source : you can transfer the BRAW Settings via Global Presets
In other cases, if you color grade Blackmagic RAW in After Effects multiple times per day and want to see the result directly, you might prefer to use our new tool BRAW Studio Layer Settings, here is more information about it :
BRAW Studio Layer Settings effect to modify the BRAW Settings
How to use
BRAW Studio Layer Settings is your new plugin to import and color grade Blackmagic RAW files directly inside After Effects Filters GUI. This means whatever effect you apply on it, text you want to show on screen, visual and motion graphics you add on your composition, everything will be previewed directly within After Effects official interface, you won't need to go back to the Source Settings constantly outside of your composition / timeline.
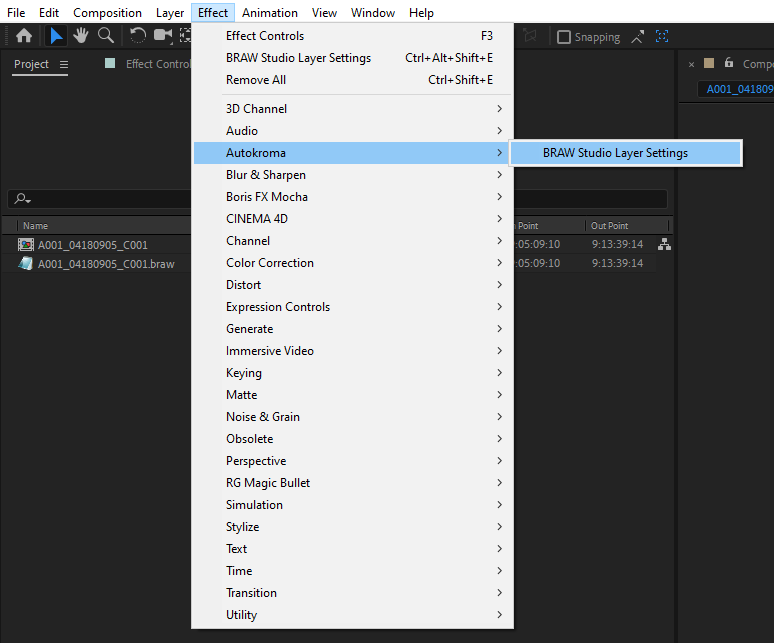
Once you added the BRAW Source in a composition, you can add the BRAW Studio Layer Settings effect (available in the effect list in the "Autokroma" category) on your BRAW Layer only. It won't work and an error will be raised if the layer is not coming from a BRAW Source file (for example if you precompose the BRAW Source, then apply the Effect onto that precomposition).
For more information on the BRAW Settings in this new Effect GUI, please read the section about Source Settings in our article "Introduction of BRAW Studio". Notes about your Layer Settings :
- This effect should be at the top of the list, because any effect before it will be erased : indeed this effect works like a generator effect (it creates the image, so the image in input of the effect is not used, you will loose it !)
- BRAW Studio Layer Settings also supports 32 bpc
- The BRAW Studio Presets are global and accessible whether you are in the Source Settings or Layer Settings, in both Premiere Pro and After Effects. They're all the same and it is a good way to copy RAW Parameters from Premiere Pro to After Effects or vice-versa
- There are some drawbacks about frame interpolation and masks
Benefit : full GPU decoding !
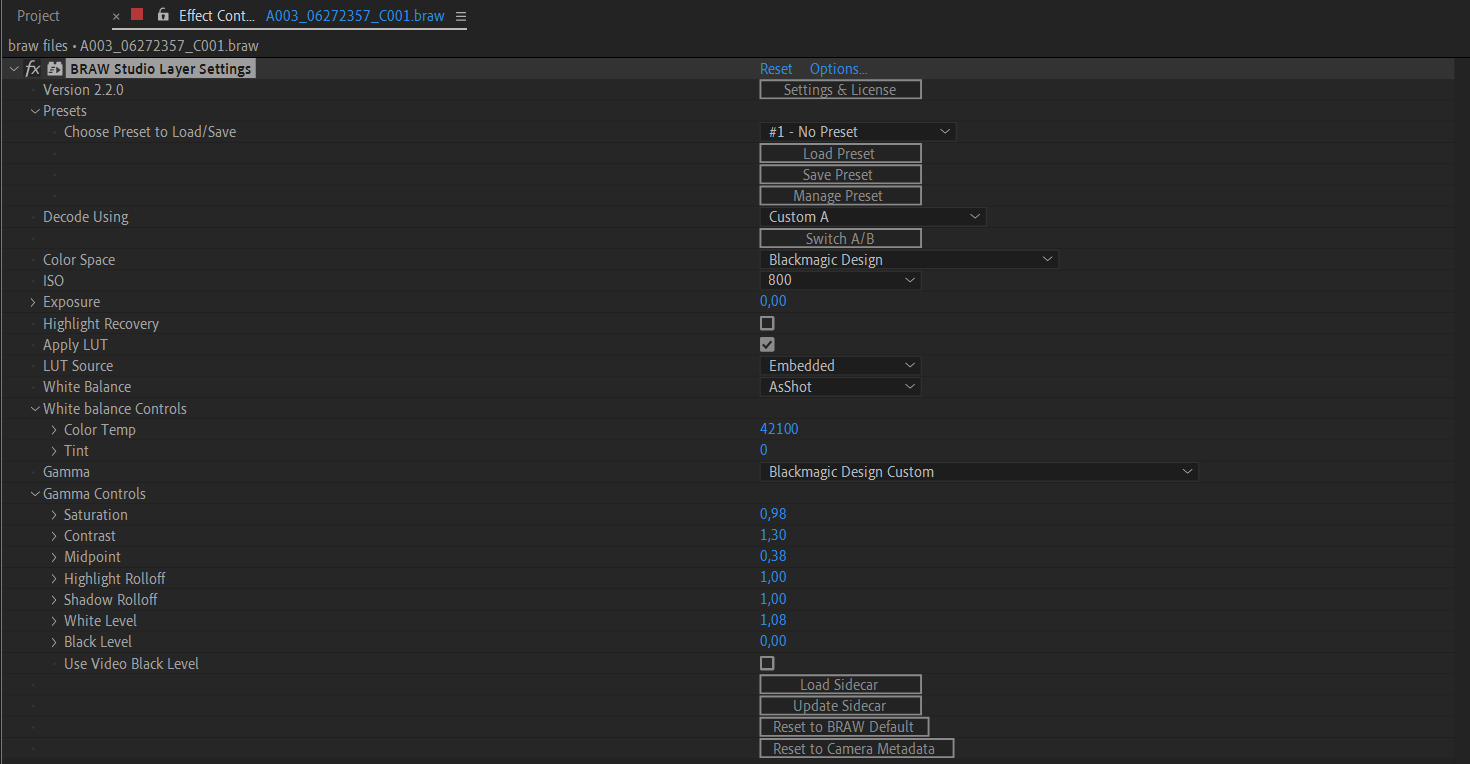
Recent versions of BRAW Studio Layer Settings uses your GPU to decode the BRAW Studio frames. As the Layer Settings bypasses the BRAW Studio Importer (and works like an importer + effect), applying the effect to a BRAW layer in After Effects will give you better performance (depending on your GPU hardware of course). Please choose your GPU acceleration in the Project Settings (top menu : File -> Project Settings) : in Windows, choose CUDA or OpenCL, on Mac choose Metal.
The GPU decoding on the Layer Settings is available on Windows from After Effects CC 2019 onwards, and on Mac from After Effects 2020 onwards.It is activated by default. If you don't want it anymore you will need to tick a checkbox in the "Settings & License" popup (available from a button in the Layer Settings effect), and click "Ok" for that.
Benefit : Metadata in the Comment section
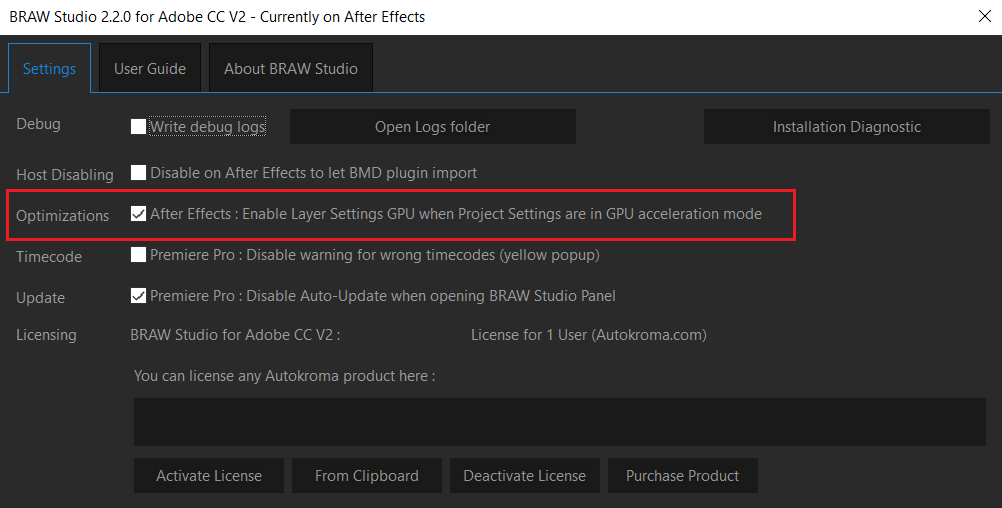
In After Effects, once you apply the Layer Settings to a BRAW Layer, if the "Comment" section of its Source, which is available in the project panel, is empty, it will be filled with some BRAW Information.
For example, you can get in the comment section : "G.0 - R.1 - S.4 - T.35 - CR.12:1"
- "G.0" means Good Take : false (G.1 would means : Good Take : true)
- "R.1" means Reel : 1
- "S.4" means Scene : 4
- "T.35" means Take : 35
- "CR.12:1" means Compression Ratio : 12:1
If you want to get more metadata here, please contact us !

Drawbacks : frame interpolation and masks
BRAW Studio Layer Settings won't interpolate frames like After Effects does officially, whether you are in Pixel Motion or Frame Mix modes (click right on a footage -> Frame Blending to change this setting, or toggle the icon in the Switches column on the left of your timeline). It's important to understand that our Layer Settings is applied after the import process from Adobe, After Effects only interpolates source footage and not footage that has effects applied on it or precompositions.
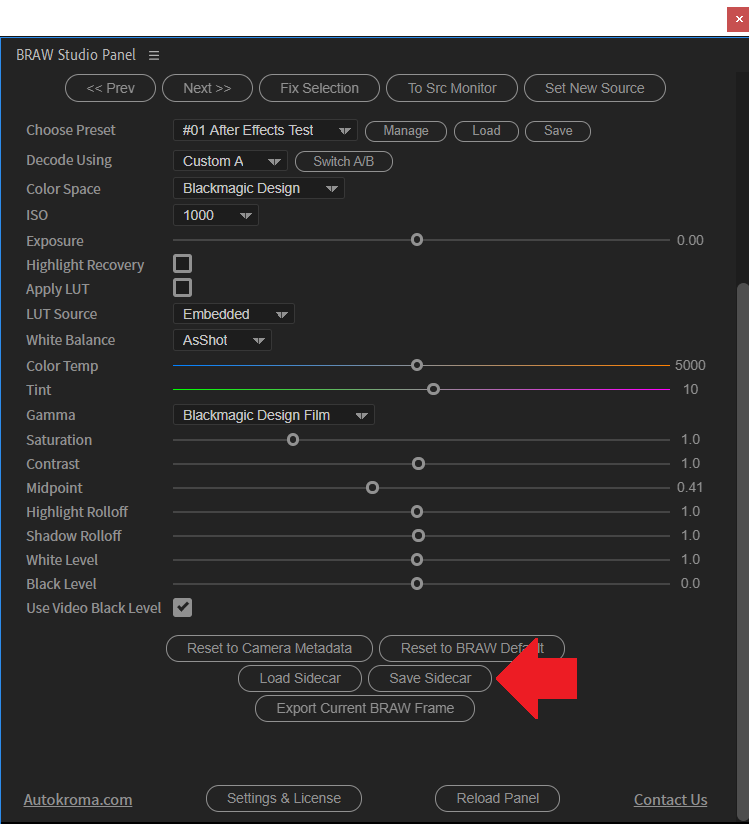
One way to workaround that is to make your color grade using our Layer Settings but then transfer the color grade to the .sidecar (hit Update Sidecar, restart Adobe, disable the Layer Settings effects). Everytime you will need to change the color grade you can re-enable the LS effect, change the color grade, hit again the Update Sidecar and restart Adobe when you'll need Frame interpolation (or masks) again. More information about the Sidecar Camera Metadata workflow later down in this article. Another workaround is to use the Source Settings as explained at the beginning of this article, you can easily transfer the color grade via global Presets.
Another limitation of our Layer Settings is that you can only apply rectangular masks (without feathers, 0px) on your .BRAW Layer if the Layer Settings is applied on it. Solving this on our side would mean drastically reducing performance, that's why we don't plan to support other kinds of masks. If you do use such masks, the output will be cropped and still rectangular without the mask applied.
You have lots of workarounds for this :
- Precompose your .braw Layer and create your mask on the composition.
- Use the Track Matte feature to report the alpha channel of a separate layer to your .BRAW Layer
- Use the Sidecar workflow with Camera Metadata as explained for the frame interpolation issue (see below)
- Use the Source Settings as explained before
It can also happen that the color grade changes slightly once you apply the Layer Settings, depending on your colorspace and others color management settings. If that's an issue for you once again you have some workarounds with the Source Settings or the Sidecar workflow, and you can still use the Layer Settings as a GUI for BRAW Settings.
Important matters to be aware of
If you use Blackmagic RAW inside After Effects regularly there's a few point you need to be aware of and how to deal with them :
The BRAW Sidecar workflow and caching issues
Blackmagic RAW .BRAW files are imported into all Adobe applications by being decoded by default with the "Camera Metadata" setting, like all .BRAW compatible applications (DaVinci Resolve, BRAW Player, BRAW Studio etc.). This means that it will try to read the .sidecar next to your .braw to apply the color grade. If it can't find it, it will use the settings from your Camera when you shot the footage. If you changed the .sidecar after importing the footage, it will keep the same old .sidecar values until your restart Media Encoder / Premiere Pro, and in After Effects it might even trigger some caching issues (see below).
You can use our Layer Settings as a way to change the .sidecar , color grade directly inside your AEfx composition with a GUI like any other effect, but when you need to change the way the .braw is imported in the first place for various reasons, you can change this .sidecar and restart all applications that will decode this .braw file to update it's default look. It's also possible to use the Source Settings to change the Sidecar.
One downside is that you will have the same color grade everytime you import this specific .braw file. In those cases you can use the Source Settings and if this workflow still isn't good enough for you, please contact us and we might find a solution for you !
Please note that changing the Sidecar after the file was imported can lead to caching issues inside After Effects ! If you import a .braw clip, scrub the timeline to add some frames into the After Effects cache and then change the Sidecar next to the .braw (inside AEfx with the Layer Settings or outside), the cache is not going to be invalidated even after restarting After Effects, and so you will have some frames with the new Settings (from the .sidecar), and old frames from the cache. To solve that particular case you can either :
- Clear the cache in After Effects and restart the application to invalidate all frames from all files
- Or open the "Source Settings" (cf. top of this article) with the Desktop Application - when the popup is closed the cache should be invalidated for the current Source Item
Transfer your Project to a colleague which has the BRAW Studio FREE version
In After Effects the Layer Settings displays a red cross on top of the image if you don't have a Premium license registered.
There is still a workaround if you want to transfer a project with some layer settings inside to a colleague which doesn't have a premium license: through the .sidecar.
First note that the "sidecar" is a file located next to the .braw file and will be used by any .braw importers to decode the image. So if from ONE braw file you have different grades (with different Layer Settings), you will need to duplicate your files first (to get one grade per file).
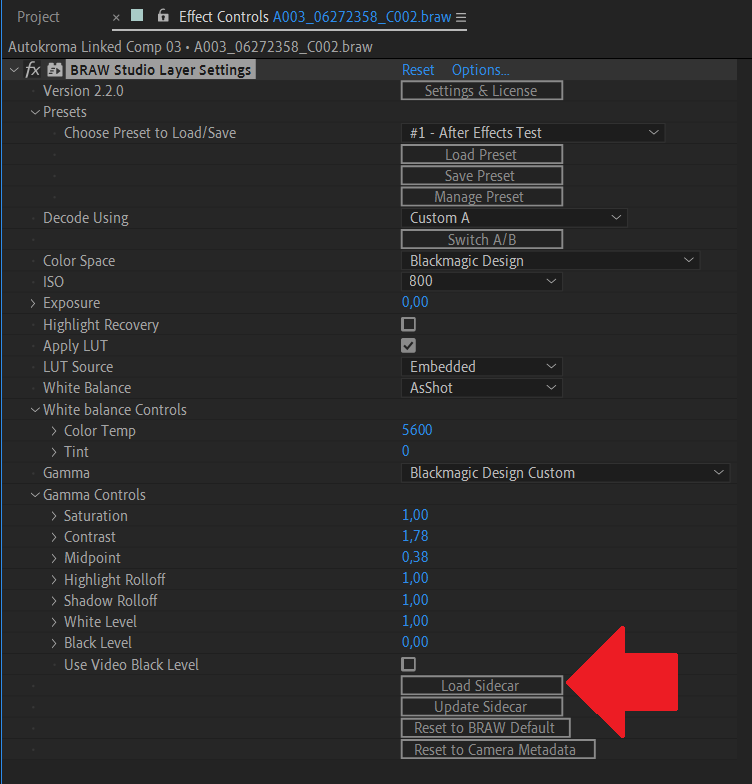
Then for each Layer Settings effect in your project, click on "Update Sidecar". It will create a .sidecar file next to the .braw file, and the importer will use that .sidecar file to decode the BRAW file. After doing this, you can disable the Layer Settings effect, restart After Effects and clear the media cache. The project will no longer need Layer Settings (because effects are disabled), so your colleague will not see the red cross on your footage.
Working with Dynamic Links from Premiere Pro
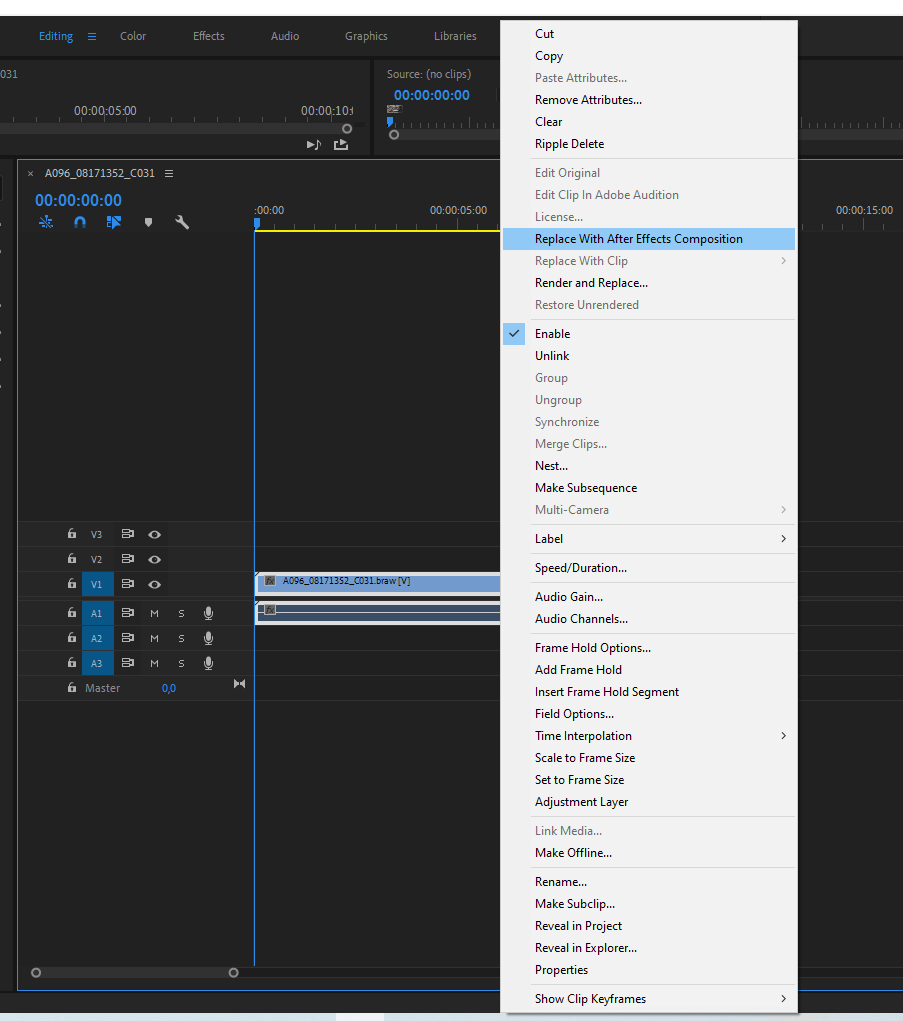
However, there is a workaround thanks to Sidecar files OR the BRAW Studio Presets feature.
First solution : you export your RAW Parameters in the .sidecar by pressing the button "Update Sidecar" in the Source Settings BEFORE sending the BRAW file to After Effects via Dynamic Link, After Effects will load the values inside this Sidecar file by default (because of the "Camera Metadata" decoding mode as described previously).
You will be able to use Dynamic Link to work with Premiere Pro, but the RAW
Parameters applied in the "Source Settings" of Premiere Pro will not be
transferred by the dynamic link when from Premiere Pro you click on "Replace
with After Effects Composition"
However, there is a workaround thanks to Sidecar files OR the BRAW Studio
Presets feature.
First solution : you export your RAW Parameters in the .sidecar by
pressing the button "Update Sidecar" in the Source Settings BEFORE sending the
BRAW file to After Effects via Dynamic Link, After Effects will load the values
inside this Sidecar file by default (because of the "Camera Metadata" decoding
mode as described previously).
Second solution, you can apply the Layer Settings on your After Effects BRAW Layer, and then hit the "Load Preset" button, which will load what has been saved previously in the preset (when you were in Premiere Pro for example). This solution is the best and can work with both software opened at the same time !
Working with low resolutions to improve performance
To get more performance from BRAW Studio, you should obviously reduce the playback resolutions. But you should choose 1/2, 1/4 or 1/8 (1/8 being of course the fastest) instead of other resolutions (i.e. do not choose 1/3). They are faster because they are native to the way Blackmagic RAW file format works : each frame is encoded in the file in a progressive way that makes it really easy to decode it quickly in half, quarter and eighth resolution. This applies to both the Importer and the Layer Settings, and it also applies to playing .BRAW files in Adobe Premiere Pro !
Do you want more features in BRAW Studio for After Effects ? Contact us and tell us your needs !
